Assigning a Custom Domain Name to an AWS API Gateway
I wrote a solution that included a REST API implemented with API Gateway, which necessitated the use of a custom domain. I found a few resources while researching how best to implement (see the following links), but I didn’t find anything that was accurate and succinct. I’ve Created this article for that purpose.
- Setting up custom domain names for REST APIs
- How do I define a custom domain name for my Amazon API Gateway API?
- Importing Certificates into AWS Certificate Manager
This article provides step-by-step instructions to add a custom domain name to an API Gateway using the web console – as it existed on or around the 1st quarter of 2020.
A few assumptions…
- I start the instructions assuming you’ve logged into the AWS console.
- I assume you have an API already.
- The DNS name added in the directions is “api.mycompany.com”. This is a fictional name. I assume you’ll replace this value with whatever DNS name you’re assigning to the API.
Before you start…
- You’ll need a user in an AWS account with rights to perform this action.
- You must load the certificate into the same AWS region as the one hosting the API.
- Your certificate needs to employ an RSA key size of 1024 or 2048 bit.
Execute the following instructions to create a custom domain name for an API Gateway:
- Load the api.mycompany.com certificate into AWS Certificate Manager in your hosting region e.g., US-East-2.
- Navigate to the AWS Certificate Manager service from the AWS console.
- If this is your first time using ACM, click the Get started button under Provision certificates.
- Choose Import a certificate.
- Paste the PEM encoded certificate to the Certificate body text area.
- Paste the PEM encoded private key into the Certificate private key text area.
- Click Review and import.
- Click import.
- Create custom domain name in AWS API Gateway.
- Navigate to the Amazon API Gateway service from the AWS console.
- Select Custom Domain Names from the menu on the left side of the page.
- Click the + Create Custom Domain Name button.
- Select HTTP.
- Enter the domain name into the Domain Name field e.g., api.mycompany.com.
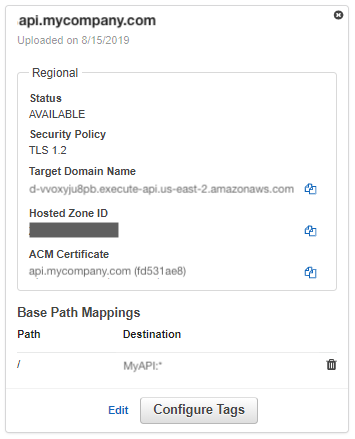
- Select TLS 1.2 from the Security Policy option group.
- Select Regional from the Endpoint Configuration.
- Select
api.mycompany.comfrom the ACM Certificate drop down. - Click Save.
- Click Edit.
- Click Add mapping.
- Enter “/” in the Path field.
- Select the “My-API-Name” from the Destination drop down.
- Click Save.
- From the newly created custom domain name, create a mapping to the deployed API’s stage.
- Create CNAME record for
api.mycompany.comto Target Domain Name in new custom domain name.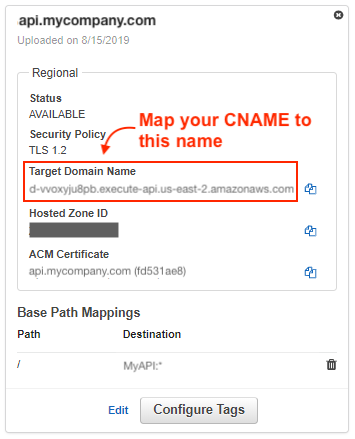
When you first create the base path mapping, you might be enticed to connect to an endpoint using the target domain name. That won’t work. The target domain name is meant to be the target of your CNAME record, it’s not accessible independently. Once the alias record has been updated, give the change a few minutes to propagate. You can then attempt to access your endpoint via cURL or Postman:
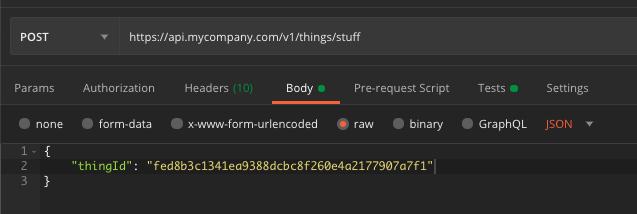
curl --location \
--request POST 'https://api.mycompany.com/v1/things/stuff' \
--header 'Content-Type: application/json' \
--header 'Content-Type: text/plain' \
--data-raw '{
	"thingId": "fed8b3c1341ea9388dcbc8f260e4a2177907a7f1"
}'
It took between 5 and 20 minutes for the DNS change to take affect during for me. If you’re having problems after having followed these instructions and given DNS 20 (or more) minutes to update, something went wrong.