Append to a Static List in a YAML CloudFormation Template

When writing CloudFormation stack templates, I sometimes need to create a list combining things defined at runtime and static values.

Imagine you have a template that contains a mapping, which enumerates IAM roles by environment. You want to grant permission to these roles as well as one or more Lambda execution roles. Can you create a list comprised of the static values defined in your map with references to roles created as part of your stack?

The FindInMap intrinsic function returns a set when the mapped value is a list, such as in our example. The Join function creates a string composed of the elements in the set separated by a given value.

You may perform a join on a set returned from the FindInMap function, returning a string composed of the elements in the set delimited by comma. You can then join the comma delimited string with a list of values. This second list can include references to resources created in the template.

!Join
  - ","
    - - !Join [",", !FindInMap ["MyMap", "foo", "thing"]]
    - !Ref "Thinger"

The following shows a CloudFormation stack template using this technique juxtaposition to an instance of the provisioned resource..

AWS CloudFormation Append Value to List
You’re seeing a role definition in a CloudFormation stack template shown juxtaposition to an instance of the resource provisioned. The role’s definition includes a list of ARNs. The ARNs are a combination of a static list provided by a mapping, and an execution role for a Lambda. The provisioned role reflects the complete list.

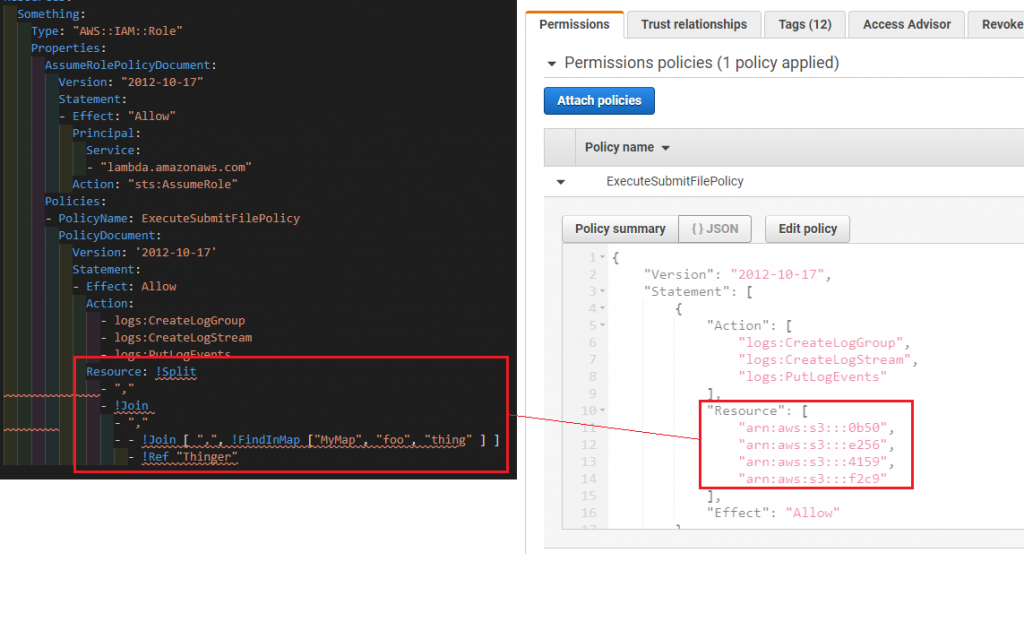
Notice the provisioned resource is a superset of the two lists. The following is the complete template:

Description: Sample Stack
Parameters:
  Thinger:
    Type: "String"
    Default: "arn:aws:s3:::f2c9"
Mappings:
  MyMap:
    foo:
      thing:
        - "arn:aws:s3:::0b50"
        - "arn:aws:s3:::e256"
        - "arn:aws:s3:::4159"
      thang:
        - "arn:aws:s3:::8199"
        - "arn:aws:s3:::d9f1"
        - "arn:aws:s3:::bc2b"
    bar:
      thing:
        - "arn:aws:s3:::bd69"
        - "arn:aws:s3:::eb00"
        - "arn:aws:s3:::0f55"
      thang:
        - "arn:aws:s3:::5ebc"
        - "arn:aws:s3:::4ccb"
        - "arn:aws:s3:::85c2"
Resources:
  Something:
    Type: "AWS::IAM::Role"
    Properties:
      AssumeRolePolicyDocument:
        Version: "2012-10-17"
        Statement:
          - Effect: "Allow"
            Principal:
              Service:
                - "lambda.amazonaws.com"
            Action: "sts:AssumeRole"
      Policies:
        - PolicyName: ExecuteSubmitFilePolicy
          PolicyDocument:
            Version: "2012-10-17"
            Statement:
              - Effect: Allow
                Action:
                  - logs:CreateLogGroup
                  - logs:CreateLogStream
                  - logs:PutLogEvents
                Resource: !Split
                  - ","
                  - !Join
                    - ","
                    - - !Join [",", !FindInMap ["MyMap", "foo", "thing"]]
                      - !Ref "Thinger"
Outputs:
  UnifiedList:
    Value: !Join
      - ","
      - - !Join [",", !FindInMap ["MyMap", "foo", "thing"]]
        - !Ref "Thinger"

The utility of this technique is debatable. That said, it’s a useful pattern for joining two sets in a CloudFormation stack template.

KeyLookup Exception Thrown When Calling awsglue.utils.getResolvedOptions() Locally

I was locally testing a PySpark script I’d written for an AWS Glue job I was building when I ran across the error relating to the call to getResolvedOptions(). The call was generating a KeyLookup exception. The problem was with the argv parameter I supplied.

When a Glue job is executes, parameters are passed to the script through sys.argv. Typically, you pass sys.argv to getResolvedOption(args, options) with the options you want to tease from the list – see Accessing Parameters Using getResolvedOptions for details.

You can mimic this behavior when running this script locally:

from pprint import pprint as pp
from awsglue.utils import getResolvedOptions

argv = ['whatevs', '--JOB_NAME=ThisIsMySickJobName']
args = getResolvedOptions(argv, ['JOB_NAME'])

pp(args)

The following is me running a script that contains the above code locally:

Screen Shot Calling getResolvedOptions() with Fabricated Arguments

The trick is that the list passed as the argv parameter needs values to use the pattern:

--KEY=VALUE

For example…

--JOB_NAME=ThisIsMySickJobName

Access Images Stored in AWS S3

I built a very simple image storage solution for a client. The solution stored imagery in an S3 bucket. The images were retrieved by various components referencing the image’s S3 URL. One of the developers asked for guidance on how to access imagery from the bucket.

Step-1: Create the Bucket

AWS provides a fantastic article for folks new to S3: Getting Started with
Amazon Simple Storage Service
. The piece includes guidance on creating an S3 bucket through the AWS console. I’ll create the bucket using the AWS CLI:

aws s3 mb s3://nameofmybucket

Step-2: Grant Read Access to the Bucket

For this example, I’m going to make objects in the bucket publicly accessible. To make that change, you’ll need to shoot over to the bucket’s Permissions tab in the console:

{
    "Version": "2012-10-17",
    "Statement": [
        {
            "Effect": "Allow",
            "Principal": "*",
            "Action": "s3:GetObject",
            "Resource": "arn:aws:s3:::<your-bucket-name>/*"
        },
        {
            "Effect": "Allow",
            "Principal": "*",
            "Action": "s3:ListBucket",
            "Resource": "arn:aws:s3:::<your-bucket-name>"
        }
    ]
}
  1. Select the CORS configuration block:
  2. Add the following policy to the CORS confiration editor and click Save.
<?xml version="1.0" encoding="UTF-8"?>
<CORSConfiguration xmlns="http://s3.amazonaws.com/doc/2006-03-01/">
    <CORSRule>
        <AllowedOrigin>*</AllowedOrigin>
        <AllowedMethod>GET</AllowedMethod>
        <MaxAgeSeconds>5000</MaxAgeSeconds>
        <ExposeHeader>x-amz-request-id</ExposeHeader>
        <ExposeHeader>x-requested-with</ExposeHeader>
        <ExposeHeader>Content-Type</ExposeHeader>
        <ExposeHeader>Content-Length</ExposeHeader>
        <ExposeHeader>x-amz-server-side-encryption</ExposeHeader>
        <AllowedHeader>*</AllowedHeader>
    </CORSRule>
</CORSConfiguration>

What did you just do? You’ve removed the default safety measures AWS employs to prevent public access to your bucket, and you’ve created a bucket policy (affects the whole bucket) that permits folks to list the buckets contents and read files from the bucket. Lastly, you’ve enable cross-origin access to the bucket.

CORS is a security feature built into modern browsers, which prohibits a site from access content from a site on a different domain. You can read about CORS from here.

Step-3: Create Your Web Page

The following is my 3rd grade quality simplistic web page:

<html>

<head>
    <title>Web Page with Images Hosted on S3</title>
    <script>
        function downloadArtwork() {
            const imageUrl = "https://nameofmybucket.s3.us-east-2.amazonaws.com/funny_cats.jpg";
            const requestType = 'GET';
            const isAsyncOperation = true;

            // Get the image from S3
            const request = new XMLHttpRequest();

            // Initiate image retrieval
            request.open(requestType, imageUrl, isAsyncOperation);

            // Handle the data you get back from the retrieve call
            request.onload = function () {
                let binary = "";

                // New image object
                const image = new Image();
                const response = request.responseText;

                // Convert the gobbly-gook you get into something your
                // browser can render
                for (i = 0; i < response.length; i++) {
                    binary += 
                        String.fromCharCode(response.charCodeAt(i) & 0xff);
                }

                image.src = 'data:image/jpeg;base64,' + btoa(binary);

                // Link the image data to the image tag/node in your page
                const imageFromS3 = 
                    document.getElementById('exampleImageFromS3');
                imageFromS3.src = image.src;
            }

            request.overrideMimeType('text/plain; charset=x-user-defined');
            request.send();
        }
    </script>
</head>

<body onload="downloadArtwork()">
    <h1>Option-1: Reference the file host in S3</h1> <img
        src="https://nameofmybucket.s3.us-east-2.amazonaws.com/funny_cats.jpg" alt="Using 'img'">
    <h1>Option-2: Download the file from S3</h1> <img src="#" id="exampleImageFromS3" alt="using JavaScript" />
</body>

</html>

The page access the funny_cats.jpg image from my S3 bucket in one of two ways:

  • Option-1: Link directly to the image in the bucket
  • Option-2: Use JavaScript to retrieve the image and add it to the page

And, there are the Gotchas…

When I first created this sketch, I didn’t have CORS enabled on my bucket. I wanted to see the headers coming back from S3, and I didn’t want the browser and page in the way. So, I mimicked the pull with cURL:

curl -H "Origin: https://whatever.net" \
-H "Access-Control-Request-Method: GET" \
-H "Access-Control-Request-Headers: X-Requested-With" \
-X OPTIONS \
--verbose \
https://nameofmybucket.s3.us-east-2.amazonaws.com/funny_cats.jpg

You’re looking for the Access-Control-Allow-origin header on the response, and an HTTP response code of 200.

You can also see the headers associated with HTTP calls from a page in the Chrome.

  1. Select Developer Tools: (Elipse) > More Tools > Developer Tools.
  2. Select the Network tab.
  3. Select the name of the image file from the pane on the left in the console to see the headers associated with its request/response.
|   

Assigning a Custom Domain Name to an AWS API Gateway

I wrote a solution that included a REST API implemented with API Gateway, which necessitated the use of a custom domain. I found a few resources while researching how best to implement (see the following links), but I didn’t find anything that was accurate and succinct. I’ve Created this article for that purpose.

This article provides step-by-step instructions to add a custom domain name to an API Gateway using the web console – as it existed on or around the 1st quarter of 2020.

A few assumptions…

  • I start the instructions assuming you’ve logged into the AWS console.
  • I assume you have an API already.
  • The DNS name added in the directions is “api.mycompany.com”. This is a fictional name. I assume you’ll replace this value with whatever DNS name you’re assigning to the API.

Before you start…

  • You’ll need a user in an AWS account with rights to perform this action.
  • You must load the certificate into the same AWS region as the one hosting the API.
  • Your certificate needs to employ an RSA key size of 1024 or 2048 bit.

Execute the following instructions to create a custom domain name for an API Gateway:

  1. Load the api.mycompany.com certificate into AWS Certificate Manager in your hosting region e.g., US-East-2.
    1. Navigate to the AWS Certificate Manager service from the AWS console.
    2. If this is your first time using ACM, click the Get started button under Provision certificates.
    3. Choose Import a certificate.
    4. Paste the PEM encoded certificate to the Certificate body text area.
    5. Paste the PEM encoded private key into the Certificate private key text area.
    6. Click Review and import.
    7. Click import.
  2. Create custom domain name in AWS API Gateway.
    1. Navigate to the Amazon API Gateway service from the AWS console.
    2. Select Custom Domain Names from the menu on the left side of the page.
    3. Click the + Create Custom Domain Name button.
    4. Select HTTP.
    5. Enter the domain name into the Domain Name field e.g., api.mycompany.com.
    6. Select TLS 1.2 from the Security Policy option group.
    7. Select Regional from the Endpoint Configuration.
    8. Select api.mycompany.com from the ACM Certificate drop down.
    9. Click Save.
    10. Click Edit.
    11. Click Add mapping.
    12. Enter “/” in the Path field.
    13. Select the “My-API-Name” from the Destination drop down.
    14. Click Save.
      Certificate Configuration
  3. From the newly created custom domain name, create a mapping to the deployed API’s stage.
  4. Create CNAME record for api.mycompany.com to Target Domain Name in new custom domain name.

When you first create the base path mapping, you might be enticed to connect to an endpoint using the target domain name. That won’t work. The target domain name is meant to be the target of your CNAME record, it’s not accessible independently. Once the alias record has been updated, give the change a few minutes to propagate. You can then attempt to access your endpoint via cURL or Postman:

Call API Using Custom Domain Name via Postman
curl --location \
--request POST 'https://api.mycompany.com/v1/things/stuff' \
--header 'Content-Type: application/json' \
--header 'Content-Type: text/plain' \
--data-raw '{
	"thingId": "fed8b3c1341ea9388dcbc8f260e4a2177907a7f1"
}'

It took between 5 and 20 minutes for the DNS change to take affect during for me. If you’re having problems after having followed these instructions and given DNS 20 (or more) minutes to update, something went wrong.

Generating a Uniquifier for Your Resources in CloudFormation

I don’t generally name CloudFormation resources explicitly. However, once in a while, I want to explicitly name a resource, and I want whatever this resource name is to be unique across stacks. This lets me deploy multiple instances of the stack without worrying about naming collision. Oh, and I don’t want the unique portion of the name to change each time I update the stack. This is important. If I use this technique on an S3 bucket (for example), I’d get a new bucket with each stack update, and I don’t want that.

One quick-and-dirty way to accomplish this is to leverage the stack id(entifier). Consider the CloudFormation template:

---
Outputs:
  MyBucket:
    Value: !Select [6, !Split [ "-", !Ref "AWS::StackId" ]]
    Export:
      Name: "MyBucket"
Resources:
  MyBucket:
    Type: "AWS::S3::Bucket"
    Properties:
      BucketName: !Sub
        - "mybucket-${Uniquifier}"
        - Uniquifier: !Select [6, !Split [ "-", !Ref "AWS::StackId" ]]

I’m building the template with something like the following (run in bash):

aws cloudformation deploy \
--stack-name "KewlStackAdamGaveMe" \
--template-file "<full-path-to-template-file>" \
--capabilities CAPABILITY_IAM

You’ll end up with a stack and S3 bucket that looks like the following:

Deployed Cloudformation Stack

I’m using the last the last 12-characters of the stack id, but you can use the whole thing if you’d like to. Keep in mind the naming rules for S3 buckets. Either way, you get the gist of how I’m creating a unique name that stays unique across stack updates.